this blog is essentially an online diary of my little creative projects - if you can't fix it, throw some glitter over it and add a lacy edge and everything will be alright.

Friday 15 April 2016

Starburst Crochet Beret....Completely Ignoring Patterns


I'm sorry to have to report that I went through this winter without a hat. I know, I know, what a tragic tale. It is of course only now that I find a crochet pattern for a beret which I like the look of:

Beret for Web
www.bhookedcrochet.com/2015/02/22/crochet-beret-pattern
It's a beautiful hat I'm sure you'll agree. However, I wasn't loving the ribbed brim she had going on, or the fact that the way the pattern is written out is a little hard to follow (not that I could have done any better....also I shouldn't really complain as it was posted online totally free...). So instead of following the pattern or watching the youtube video of how to make it, I followed the stitch diagram that was provided for the first couple of rows:

Diagram


 And then, well, sort of just made it up as I went along until I had a hat:


Helpful, right? I must say I am rather fond of the starburst stitch, though you do find yourself in situations like this:


That's right, 9 hoops on my hook. 9!!! I feel like I can pretend I'm a knitter now. In fact I am so chuffed with the actual making process of this one that I may even crochet a matching scarf. Thank goodness for pinterest:

http://4.bp.blogspot.com/-kQWDpHJQzG0/VmQOeRbqDPI/AAAAAAAAZWI/UNw8IOzE2F8/s1600/11235381_904533442950913_5890866384571744277_n.png
tinashandicraft.blogspot.co.uk/2015/12/scarves.html?m=1

Wednesday 13 April 2016

Customising T-Shirts With An Old Friend

Summer is finally here! So it's time to revamp the wardrobe a little, but without spending lots of money because, y'know, who wants to spend loads on clothes when there's wine and cake to be had? Customising plain t-shirts is a fun way to add new and totally unique pieces to your summer look without breaking the bank. The beauty of this D.I.Y. is that you can do pretty much whatever pops into your head!

Time to grab some cheapy cotton t-shirts, a fabulous friend and a bottle of bubbly. Plus any or all of the following:
  • scissors
  • thread
  • fabric paints/pens
  • card for making stencils
  • fabric for appliqueing
  • beads/general findings
  • tassels/pompoms
My best friend Ellen and I came at this from totally different angles - she went straight for the fabric paint and painted/stenciled pinterest/Harry Potter inspired designs on the front of her new tops (and they turned out so well!). I made a grab for the scissors and hacked away at the back of my tops, leaving the fronts plain, then prettied them up afterwards with stitching and paint. I'm really happy with one, the other....well it's always useful to have scrap fabric in the craft box!

When in doubt, cover it in bees. Can this be my catchphrase? It's not very catchy....
I say 'hacked away', but there was a degree of planning with this one - I made a rough hexagon template and drew around it three times running down the back. I then cut out the one nearest the neck and realised that stitching around them before cutting would help the hexagons keep their shape. So I stitched, and then I cut, and then I stitched a bit more, splodged on a little black fabric paint and did a little free-hand embroidery of a bee over the top.

It's pretty minimalist but I find with a top that it's often more striking to go with the less-is-more approach. I do however, now have to find a bra which doesn't totally wreck the look...oh well.

BEE!!!!!!


Thursday 7 April 2016

I'm Back! (Again) And This Time There Will Be Capitalisation, Maybe Even Grammar....The Spelling Will Still Be Pants Though.

A good friend once told me that I need to finish what I start. And looking over the last year or so, she has a point - I have started, despaired over, and eventually deleted 8 blogs. 8!!!

This is the only one I do not have the heart to erase.

I have poured too much of my silly into it.

I suppose it makes sense to continue on then. Here's a couple of things I have done recently(ish):

I made Harry Potter style wands out of chopsticks (just add a glue gun and paint).
And Golden Snitch Christmas decorations...guess who went to the Harry Potter Warner Bros Studio before Christmas... Shrinkles wings, gold pen, heat tool, glue gun etc. 
I wrote my first complicated crochet pattern. I'm not going to do this again unless I get a long holiday, and maybe some sort of payment.
And I became a bit mermaid obsessed - indelible ink pen fabric appliques on pre-existing lace top.
So yeah, not a whole lot has changed. I'm happy though, and will aim to post again soon : )

Thursday 30 October 2014

crochet strawberry leaves with a tiny spider

it's almost halloween! and my mother has lovingly crocheted me a spider brooch for the occasion, so naturally, i have made a little something for her in return:


a spider brooch! ok, so i wasn't having the most original moment when i decided to give a spider brooch to someone giving me a spider brooch...but i think it's cute. the leaves are strawberry leaves from caitlin sainio's 100 lace flowers to crochet which i did in size 30 variegated green with a 1.5 hook. the 'web' bit i did in white sewing thread with a 0.6 hook (it's just a cluster of treble-trebles and a length of chain). and the spider is four bits of size 30 black thread, knotted together in a double knot for the body, with single knots for the knees:


yep, i'm pretty happy with this.

Wednesday 29 October 2014

embroidered hermes wing shoes

anyone who follows this little blog closely, or anyone who looks too closely at my feet, will realise that i have a thing about putting wings on my heals. i don't know why but it just has to be done. here's a little recap for those of you at the back of the class who weren't paying attention:


now i'm in a new city, new streets, new shoes... and here's what happened this time:


 you will need:

el cheapo tat primark flats £4
gold metalic embroidery thread ~£2
a strong needle

to make:

embroider some wings on the heels of your cheap, thin shoes.

enjoy.

(i'm afraid that i did just make it up as i went along with these. 'free form stitching' i think it's called, or stitch doodle if you're me.)
 

Monday 27 October 2014

crocheting in a convent in london

ok, i'm giving up any pretense i had of blogging on any kind of regular basis. sorry about that. life got in the way, as it usually does - i've moved house yet again, only this time i've abandoned scotland all together and ended up in london, which i can't really afford on my shop girl pay, so i'm crashing in a convent until something else comes along.

the usual kind of crazy then.

i miss scotland. i miss my friends, my work mates, my old laid-back job. i miss having the freedom to do whatever i like, whenever i like, without having to worry about a curfew or upsetting nuns or upsetting my mother. i haven't been myself here yet; new job and strict home life mean that i'm on constant egg shells, all smiles and good behavior. and i'm reminded of the life advice a much loved maths teacher once gave me in the street, "do what you're good at".

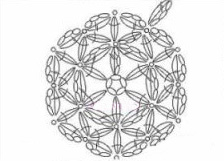
so here i am in a quiet corner of london holding a crochet hook and building my life back up again, one treble at a time:


yes, that's my bedside table in the convent, and yes, that is a lacy heart shaped coaster for my mug. it already has tea stains on it, but that's ok.

you will need:

size 30 white thread and a 1.75 crochet hook

meathod:

now, i was a bit cheeky with this one so i'm not going to put a link to the pattern. you see it was part of a vintage booklet of heart shaped crochet lavender pillow patterns which a wonderful fellow is/was selling on ebay...and included in the photos of the product was the page featuring the entire pattern for this heart.

oops.

i did modify it a bit, opting for a row of clusters around the outside rather than the big frilly thing it had going on. anyway, if you search the internet hard enough you'll no doubt find the pattern as well.

have fun.


Thursday 21 August 2014

tissue paper flowers - floofing tutorial

i am a (rather sporadic) letter writer. when sending letters i like to include a cute flat thing to make up for the potential lack of content in the actual letter. in my most recent bout of correspondence i sent many people a tissue paper flower, ready to be floofed up to full glory. yes, ok, when i say that i sent them tissue paper flowers, i do in fact mean that i sent them some coloured tissue paper which i had loving concertinaed, trimmed, and stapled in the middle. what they got looked much like this:


the very technical floofing process seems to have stumped some people though, so here's what you do.

1. expand the concertina like a fan:


2. pull up individual layers of tissue paper, it should start off looking like this:


2 continued. and go on to look like this:


3. now do the same thing to the other side, and, wait for it.....you've made a flower! well done!:


now to make this particular flower i used 4 sheets of pale orange, two sheets of dark orange and two sheets of red. layer squares of the same size in that order, concertina, staple, floof.